
Bloom Bloom Pow Quilt: Cutting your fabric
Welcome to post #3 of the Bloom Bloom Pow Quilt-Along! Are you guys ready to cut into some fabric? Let's dive right in!
Note: If you're using fat-quarters, look for the note about cutting fat-quarters at the bottom of this post.
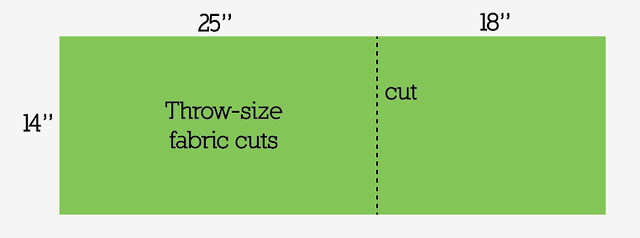
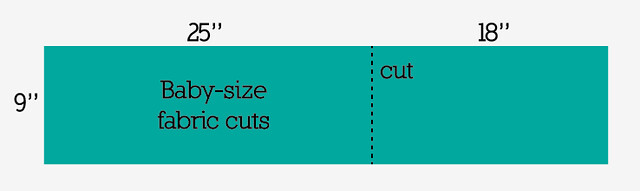
First, remember those value stacks that we made in last week's post? Take all your dark-value and medium-value prints and cut the width of fabric into two sections, a 25" wide section and an 18" wide section (see diagrams below). Light-value prints can stay whole for now.
Done with that? Great! Now, before we do anything else, we need to start thinking about how to pair up the colors for each block. If you cut first and then think about color pairings, you might waste fabric. So here's the method I recommend following for each block:
1. Start by choosing a dark- or medium-value print for the "petals." Once you've decided on a petal color, take the 25" wide section of that print and cut 2 strips 2.75" x 25" (for a full block), or 1 strip 2.75" x 25" (for a half-block).
2. Select a background color that looks good with the petal color chosen in step 1. If you selected a dark-value print in step 1, choose a medium or light value for the background. If you chose a medium-value print in step 1, stick with a light value for the background.
3. Once you've selected your background color, cut 3 pieces 4.5" x 5.5" (for a full block) or 2 pieces 4.5" x 5.5" (for a half-block). If you're cutting from a medium-value print, be sure to cut these pieces from the 18" wide section! Reserve the 25" wide section for cutting the long strips for the petals.
4. Keep the petal strips and background pieces for each block grouped together, so that you're all ready for piecing next week. One way to stay organized is to safety-pin the pieces together, or keep them in ziploc bags.Repeat this process until you've cut pieces for all the blocks in the quilt. Block totals are as follows:
Baby size - you will need:
• 14 full blocks
• 4 half-blocks
Throw size - you will need:
• 25 full blocks
• 5 half-blocks
If you run out of 2.75" x 25" strips for petals: You can cut your remaining petal strips from the 18" wide sections of dark- or medium-value prints (although I recommend sticking with the dark-value prints, so that the medium values will still be available for cutting background pieces). You will need 3 strips 2.75" x 18" for each full block, 2 strips for each half-block.Now that you have your colored fabric cut, you can move on to the solid white.
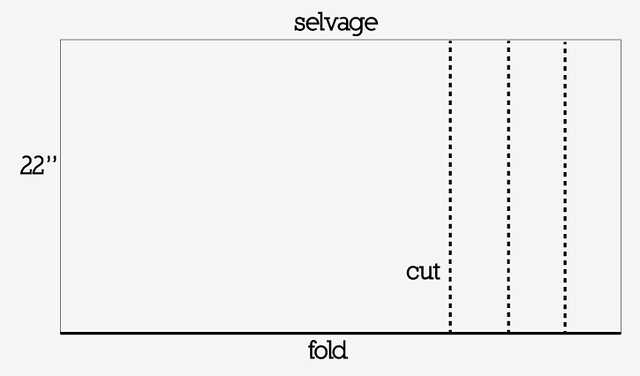
Cutting the solid white fabric: Start by folding the width of your white fabric in half, bringing the side selvage edges together. The folded size should now be 22" x 36" (baby size) or 22" x 54" (throw size).Next, cut strips perpendicular to the folded edge (so after cutting, the strips will be 22" long while still folded, 44" long when unfolded).
For the baby-size quilt, cut:
• 4 strips 4.5" wide, then sub-cut 32 pieces 4.5" x 5.5"
• 4 strips 3.25" wide, then sub-cut 32 pieces 3.25" x 5.5"
For the throw-size quilt, cut:
• 7 strips 4.5" wide, then sub-cut 55 pieces 4.5" x 5.5"
• 7 strips 3.25" wide, then sub-cut 55 pieces 3.25" x 5.5"
Note about using fat quarters:
Yes, you can use fat quarters to make this quilt! Follow the same process outlined above for cutting out each block, but of course, you will not be able to cut 25" long strips for the petals. Instead, cut your strips 2.75" x 18". You will need 3 strips for each full flower block, and 2 strips for each half-block.For the background pieces, you will need 4 pieces 4.5" x 5.5" to make a full block, and 2 pieces 4.5" x 5.5" to make a half-block.
Well, that's it! You're now officially done with cutting. Next week we'll start piecing. You won't believe how fast these blocks come together, and how much fun they are. : )
Thanks again to all you wonderful people for quilting along with me! Don't forget to post pictures of your progress in my Flickr group. If you have any questions about the QA, you can post here in the comments or in the discussion forum on Flickr. Have a wonderful week!
Quilt-Along Schedule
March 21: Introduction and Fabric Requirements
March 28: Design Strategy
April 4: Cutting Your Fabric
April 11: Make the Strip-Pieced Units
April 18: Cutting the Triangles
April 25: Completing the Top
May 2: Quilting
May 9: A Finished Quilt