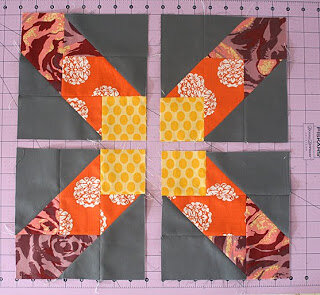
Supernova Quilt-Along: Finishing the Supernova Blocks
Welcome back to the Supernova Quilt-Along! Before we get started, let me say that this has been a ridiculous amount of fun for me. I love seeing the gorgeous Supernova blocks that you all have put together and posted in the Flickr group. There are some amazing quilts coming together, if I do say so myself!
And it's not too late to join in. Click here to find links to all the posts. In fact, you can follow along with the series at any time later on, whenever the mood strikes you.
Anyway, it looks like you ladies participating in the Flickr group are itching to finish these blocks—if you haven't done so already! So here we go:
1. Start with the four pieced sub-units for your first block, shown above.
2. Of the pieces you originally cut for your first block, you should have 13 3" squares left—four each of three prints, and one of one additional print. Here are mine.
3. Lay out your remaining 3" squares with the sub-units you pieced last week, as shown above. The print square with no remaining mates will be at the center of your block. Arrange the remaining squares in rows between the sub-units, as shown in the photo above. You want the three remaining prints to work their way out, in the same order as the print progressions that you photographed during the planning and cutting phase.
4. You're now seeing exactly what your completed block will look like when you finish piecing it. This is your last chance to evaluate the design and colors of your block, if you choose. I was planning to have you do some strip-piecing during this phase of the quilt-along, but I changed my mind about that, because I wanted to give you a small amount of design flexibility at this stage. So, if you like how your block looks, great! But if you want to tweak it, you can do that too—you could swap the order of your squares around, swap squares between blocks, or you could even cut a few new squares if you have the fabric and you're really motivated.
I like to tweak, right up to the last minute. So I decided I wanted a bit more contrast in the center of my block. I found a scrap of orange polka dots in my stash that I hadn't originally planned on including in this quilt, and cut four more 3" squares from that. Then I moved the orange/yellow squares toward the center, replacing the yellow lattice print, and ended up with the new layout shown above. Don't worry, those yellow lattice-print squares won't go to waste—in fact, I'm planning to incorporate them into the back of the quilt. Obviously I know changing out your fabric so late in the game isn't doable for everyone. But this is a design-intensive quilt, and it can be difficult to make hard-and-fast fabric choices prior to seeing the block in this way.
In general, regardless of what type of quilt you're working on or the fabric you're using, I would encourage you to always keep evaluating your design and stay flexible with it right up to the point of no return—whatever that point may be for you. Sometimes the difference between an okay design and a great one is just a matter of a few small tweaks like the one I made above.
5. So now you're ready to piece together your block! From here on out, it's cake, I promise! Start by piecing together your 3" squares as shown above. You'll piece two vertical units of three squares each, and one longer horizontal unit of 7 squares (including the center square).
6. Join each of the smaller three-square units in between two of the 8" square sub-units, as shown above.
7. Join the top, middle strip, and bottom sections. There you have it, a completed Supernova block. Your block should measure 18" square (14.5" if you're using a jelly roll). One block down, eight more to go!
And that's it for this week—hope your Supernova blocks are coming together beautifully. Next week, we'll be assembling our blocks and adding the borders for a completed quilt top. Those of you who would like to work ahead, please feel free to do so. I can't wait to see what you come up with!


