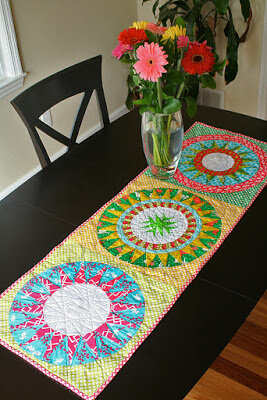
New York Beauty Quilt-Along: Block 4
Welcome to Week #8 of the New York Beauty Quilt-Along. I'm going to take you through Block 4 today. Visit Sara at Sew Sweetness to see all of the previous blocks and more details on the QA.
Block 4 is a fun one—there isn't as much paper-piecing involved as in other blocks, but there are plenty of curves to sew!
Pattern:
Sorry, this pattern is no longer available.
Fabric requirements:
(all sizes listed below assume my freezer-paper templating method described below)
Center circle (I used white)
1 block: 3" square
4 blocks (to make a complete circle): 6" square
Inner ring (hot pink with green polka dots)
1 block: 3" x 6.5"
4 blocks: 10" x 6.5"
Outer ring (hot pink with smaller white dots)
1 block: 5" x 13"
4 blocks: 16" x 13"
Background (green rings)
1 block: 9" square
4 blocks: 18.5" square
Rays, color 1 (lime green)
1 block: (4) 1.5" x 3.5"
4 blocks: (16) 1.5" x 3.5"
Rays, color 2 (darker green)
1 block: (4) 1.5" x 3.5"
4 blocks: (16) 1.5" x 3.5"
Background for rays (aqua polka dot)
1 block: (3) 3" x 3.5", (2) 2" x 3.5"
4 blocks: (12) 3" x 3.5", (8) 2" x 3.5"
Since we've already had some great paper-piecing tutorials by Kim, Sara, Jeni, Katy, and others, I'm just going to give you a few of my own tips, especially when it comes to curves (although I am by no means a curve-sewing expert!)
First up: Templates. Accurate curve piecing starts with accurate fabric cutting, and freezer paper is now my preferred method for templating in many cases. So I traced all of the non-paper-pieced sections onto the dull side of a sheet of freezer paper. (I'm making four blocks for the complete New York Beauty circle, so I traced each section four times onto the freezer paper.)
Before you do any cutting, press the freezer paper, shiny side down, onto your fabric to adhere it. Then just cut on the lines (you can use your ruler and rotary cutter on the straight lines if you prefer). Voila! Perfectly perfect pieces with minimum effort.
And here's how I got perfect straight-grain background pieces. Fold your 18.5" square in half on the diagonal, as shown, and press. It's important here that you start with a piece that is exactly square, and that all edges are aligned when you fold it in half. (If you only have a fat-quarter or a half-yard of fabric, you might be able to make do with an 18" square—in fact, that's what mine is here. A few corners got chopped off, but nothing that didn't end up hidden in the seam allowances.)
Next, tear off a piece of freezer paper at least 18" long. Place your freezer paper over the background piece, lining up the natural straight edge of the freezer paper with the angled inner seam line, as shown. Then trace around the other three sides of the shape (making sure to trace the outer line, not the inner line). You don't need to worry about the other half of the background section. If you're making a full ring, trace four copies of the background piece in the same way, making sure the pieces are as close together as possible along the edge of the freezer paper. Mine were actually touching at their widest points.
Once your shapes have been traced, press the freezer paper onto your folded background fabric. Line up the edge of the freezer paper (which serves as the angled edges of your shapes) with the fold, and cut through both layers of fabric.
Ta-da! Unfold the cut-out shape, and you have perfect straight-of-grain background pieces. This was important for me, because I wanted the print I was using to be straight and square. And you even end up with a crease right in the middle of the section, which is helpful when we piece the curves later.
Now go ahead and paper-piece your ray sections, using all the great tips that we've learned in the past 7 weeks.
My one tip here involves trimming the excess after sewing a seam. To save time, I don't worry about flipping back the paper and rotary-cutting the excess, the way many tutorials show. That involves getting up from my chair and walking to my cutting board—that's far too much work and effort! I bring my scissors and a wastebasket to my sewing machine and just snip off the excess after each seam. I just eyeball the quarter-inch seam allowance—even if it's not exactly 1/4", it's always close enough, and I've never had any problems with less-than-precise seam allowances.
Once you're done with the paper-pieced sections, it's time to piece the curves. I fold each section in half and finger-press to mark the center. I put one pin at the center of the seam I'm about to sew, and another pin at each end. Then I pin the rest of the seam, working from the center out.
And there you have it—one cheerful, sunny New York Beauty block.
If you make four of these blocks, you'll have a complete 16"-square New York Beauty, perfect for a mini quilt or a pillow. I took my block and added it to the two others I made previously, and ended up with a fun springtime table runner. (I had originally planned to make a full-size quilt, but these three just begged to be a runner!)
I took my cue on the quilting from Kati's stunning New York Beauty mini. This runner will make great table décor in future years for Easter and my youngest daughter's birthday (she turned 3 yesterday!). It's made in Laurie Wisbrun's delightful Modern Whimsy collection, plus various bright stash prints.
I think that does it for Block 4. Now go make one of your own! And come back next week, when Amy of amylouwho will be taking us through Block 2.


